Tuesday, 2 August 2022

TULLE Bolt Wedding Decoration - FuzzyFabric.com


TULLE Bolt Wedding Decoration Bolt Pew Craft Favor Fabric Bridal Favor Party Banquet Gift Decor

Tulle Fabric Bolt

 Embrace the sheer beauty of tulle by crafting stunning veils, bows, dresses, and gift bags, or drape down the ceilings, backdrops, tables, chairs, aisles, and arches to impart a dreamy allure all around your party space. Pair mesmerizing hues of our tulle fabric with matching satin drapes to create wonderful wraps for your table centerpieces for a lovely puffy appeal.

54 Inch x 40 Yards Tulle Fabric Bolt | TableclothsFactory

Fabric Bolts By Yard

Nothing beats the softness and delicateness of tulle fabric when we speak of ethereal beauty. The pretty puffy appeal and subtle shine of tulle give a true fantasy feel when swathed around the tables adding a mesmeric charm to your party ambiance. Showcase your classy sense of style by enhancing your décor with these splendidly sensuous tulle drapes and making a mesmerizing statement to delight all your guests with its charming appeal.

54 Inch x 40 Yards Tulle Fabric Bolt | TableclothsFactory

Wholesale Fabric Rolls

Not only is tulle good for adding flair and finesse to your event décor and dress designs but also for sprucing up the party ambiance to a whole new level of elegance. Usher a dreamy charm into your wedding reception, birthday, bridal shower, or baby shower party by creatively draping our tulle fabric just the way you want to add a classy touch to your décor.

54 Inch x 40 Yards Tulle Fabric Bolt | TableclothsFactory

54 Inch x 40 Yards Tulle Fabric Bolt | TableclothsFactory

Additional Information:

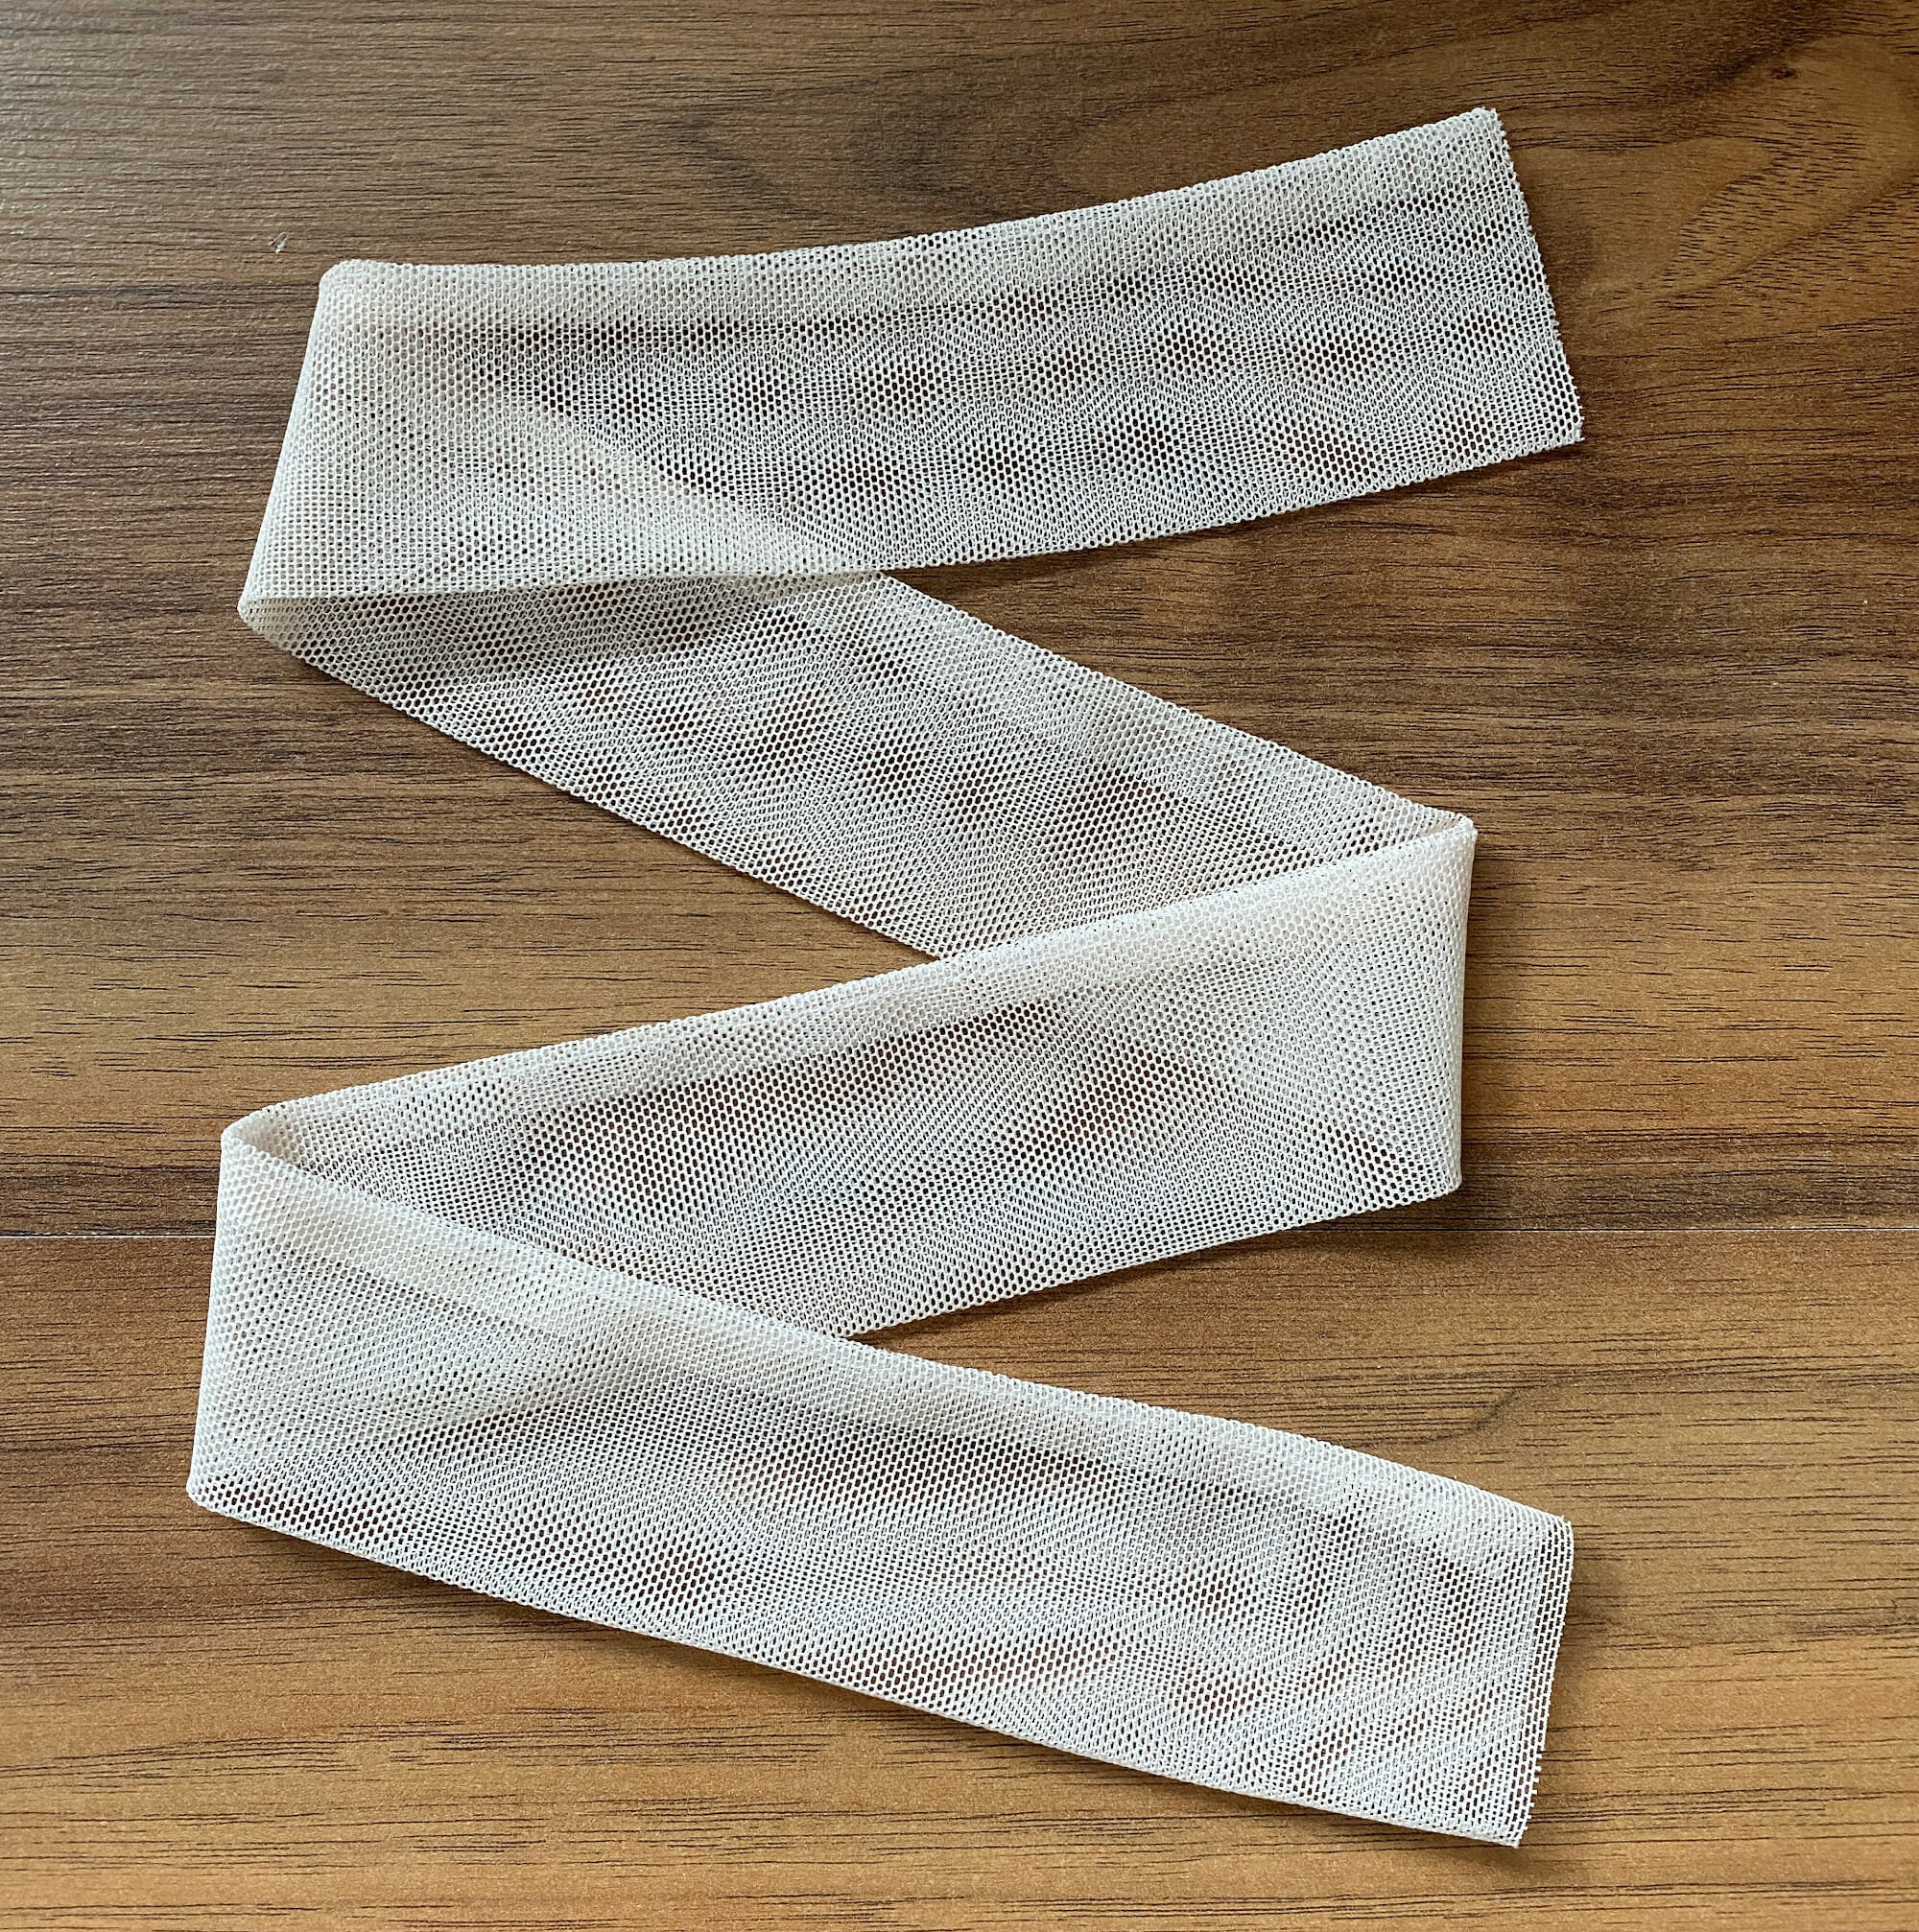
  • This tulle is light, airy and at the same time luxurious. Its high quality means that it can hold its shape and resist wrinkling which is perfect to make gorgeous tutus, costumes, dresses and wedding gowns.
  • Uses: Weddings, Parties, Events, Banquet, Decorations
    54 Inch x 40 Yards Tulle Fabric Bolt | TableclothsFactory

Thursday, 28 July 2022

How to Make Summer Wreaths and Bows with Ribbon? - FuzzyFabric.com


Summer is in full blow and you can rejoice in he warm weather months in elegance with a spring/summer wreath for your front door. In accumulation to a beautiful spring/summer wreath, you can also create some astonishing DIY using bow-making utensils.

The good thing about the beautiful DIY spring/summer bows and wreaths is that they are inordinate indoor summer crafts for the whole family. It is ideal to find one of the best fabric suppliers for buying tulle fabric, organza fabric, white polka dot ribbon, chair covers, tablecloths, and many others. Below, I’m going to share some tips to make beautiful summer wreaths or bows.

Funky Bow with Three Ribbons

Materials Required:

  • 100-Yard Bow Wire
  • Large Bow-Making Tool
  • 2 ½” Printed Plaid White-Brown Check Ribbon Roll
  • 2 ½” Canvas Wired Ribbon Roll
  • 1 ½” White polka dot Ribbon Roll

Steps:

  • Crease the bow wire in half and pleats it beneath the bow-making tool. After that, make 1 loop (3 ½” – 4”) with the white-brown check plaid ribbon, cut it off, and place it right into the bow-making tool.
  • You can take the canvas ribbon, make a loop, cut it off, and keep it right into the tool. Next, take a white polka dot ribbon, make a loop, cut it off, and place it accurately into the tool.
  • In a similar procedure, you can make 3 more loops with the three dissimilar ribbons.
  • You can secure the bow with some wire knots in the back and appearances off by botching the loops and cutting the dovetail joint outline on the tail ends.

DIY Spring/Summer Wreath

Materials Required:

  • 100-Yard Bow Wire
  • Large Bow-Making tool
  • 1 ½” Blue Ribbon Roll
  • 14” Grapevine Wreath
  • Two Categories of Blue Flower Stem with Leaves sprays/picks
  • Hot Glue

How to Make:

  • Start by folding the bow wire in half and pleat it beneath the tool.
  • After cutting off the long tails from the blue-ribbon roll, keep them right into the tool. After that, take the ribbon, flip it inside out, keep it on the tool, and make 8 loops (3 ½”).
  • Secures the bow with some wire knots in the back and finishes off by botching the loops and twisting up the tails.
  • In the end, stick the bow steadily to the wreath and complements some ornamental blue flower stems with leaves sprigs with hot glue.

These are some DIY summer wreaths and bows ideas that you can make using ribbon. You can find one of the well-known fabric suppliers for buying grosgrain ribbon, white polka dot ribbon, chair covers, table runners, and many others.

3 Stunning DIY Wedding Decoration Ideas for Every Wedding - FuzzyFabric.com


Now there seems to be the idea that not hiring a wedding planner or day-of planner is basically committing matrimony malice, but that couldn't be beyond the truth, particularly given the amount of DIY wedding decorations out there.

If you fall beneath this umbrella of décor-savvy or budget-friendly couples who want to throw the planning procedure self-sufficiently, prepare to be the best provisional wedding planner your ceremony will ever perceive. To make your life a heck of a lot calmer, we rounded up more than a few DIY wedding decorations that you and your partner can simply and elegantly chase for the big day.

  1. Arrange Your Own Bouquets

Bouquet arrangements should derive from the heart and speak to who you are as an individual, so, in that intellect, they should be easy to make on your own. Choose foraged flowers, local greenery, picks directly from the garden, or fill in with slack stems from a local florist or farmers market to style your personalized mix. Cover the base in ribbon for the concluding touch or leave long trails of fabric to complement a little flow.

  1. Bundle Boutonnieres

If you can throw the task of bundling a bridal bunch, you can unconditionally throw together a boutonniere or two - they are just miniature posies after all. Feel free to use the same combination from the bouquets, albeit with a somewhat more masculine method, and tie them together with ribbon or twine.

  1. Accessorize Baskets

We can't get an abundance of baskets as wedding decorations, not just for their countryside cuteness but for their functionality. Stuff them with fresh florae, dried stems, or ribbons and use them as containers to be carried by your flower girls, to house wedding favors, to be occupied with stationery, to pleat floral centerpieces, or to grasp contented accessories for your guests.

These are some of the best wedding decoration ideas for every wedding style. You can find one of the well-known satin fabric wholesalers for buying stain fabric, tulle fabric, organza fabric, grosgrain ribbon, lace fabric, and many others at discounted prices.  

Tuesday, 26 July 2022

How to make tulle scrunchies. Step-by-step tutorial - FuzzyFabric.com


How to make tulle scrunchies. Step-by-step tutorial

Tulle scrunchies tutorial – sewing supplies

  • soft tullemesh tulle
  • sewing machine
  • jersey/ballpoint needle
  • sewing pins
  • 1/8 inch elastic
  • safety pins
  • matching thread

DIY tulle scrunchies – step-by-step instructions

Step 1

First, cut a piece of tulle with your scissors or rotary cutter that is anywhere from 20 to 30 inches long and 4 inches wide.

cut tulle fabric, rotary cutter

You can increase or decrease the length of the tulle piece as you like, depending on how many folds you want your scrunchie to have.

For this scrunchie, I used a piece of tulle measuring 25” x 4”.

Step 2

Now, fold your tulle rectangle lengthwise and sew down the length of the tube. Use a narrow 1/4” seam allowance (or 3/8” if you are a beginner) to make a tube with two open ends.

Do not start stitching at the very edge or else your sewing machine may try to eat this lightweight fabric. Backstitch when you begin and end the tulle seam.The size 70/10 jersey/ballpoint needle that worked fine for the soft tulle scrunchies simply refused to sew mesh tulle without skipping stitches.

Apparently, stretch needles are better for sewing very stretchy fabrics. However, it’s a good idea to test your stitches with both needles (jersey and stretch) on your fabric before starting your project.

Tulle can be a little tricky to sew – in this article, you’ll find my best tips for sewing tulle on your regular sewing machine.

tulle seam

Step 3

Turn the tube inside out. I usually take a safety pin, attach it to the seam allowance, then push it through the tube to the other side. Press your tulle tube with an iron set at the lowest temperature.

turn tulle tube right side out

Step 4

Cut 6 inches of 1/8” elastic. Take one safety pin and secure the elastic at the end of the tulle tube. (Because you don’t want to lose the elastic into the tube.)

attach safety pin at the end of the tulle tube

Then take another safety pin, attach it to the other end of the elastic and thread it through the tube.

tulle scrunchie step by step instructions

Step 5

Tie the two ends of the elastic together. Of course, you can sew both ends of the elastic together, but the fastest way is to tie the elastic. After that, push the elastic back into the tube so the knot is hidden inside.

tie elastic ends, tulle scrunchie sewing tutorial

At this point, you can try the tulle scrunchie on your hair and see if it’s a good size for your hair. If it’s too big or small, adjust the elastic length accordingly.

Also, if you want to use pompoms or small flowers, now is the time to put them into your tube.

Step 6

Now, straighten the tulle fabric to make sure the seam is not twisted. The seam should be in the same position all the way around the scrunchie.

sewing tutorial for a tulle scrunchie

Fold one short end of tube 1/2″ toward the wrong side. Finally, let’s bring the tube edges together and finish this scrunchie. Put the raw end of the tube inside the folded end and overlap by 1/2″ so the inside raw edge is hidden.

DIY mesh tulle scrunchie

Make sure the tulle seams line up and use one or two pins to secure the overlapped ends. Sew to close the gap. Again, backstitch at the beginning and at the end of the seam. I like to stop just before I reach the elastic – something I wouldn’t be comfortable doing with a cotton scrunchie, but tulle doesn’t fray, so it’s a safe bet.

mesh tulle scrunchie sewing tutorial

Now puff and fluff your tulle scrunchie and you are done! This is such a satisfying and quick sew, am I right?

8 Ways to Craft With Ribbon Ideas - All Seasons - FuzzyFabric.com


8 Ways to Craft With Ribbon Ideas - All Seasons

1. Ribbon Flowers

ribbon flower

Have any scrap ribbon and buttons leftover from a sewing project? Turn them into these adorable, easy-to-make ribbon flowers at no extra cost to you. These look great adorned to headbands, bags, or even as magnets. Or, spend a crafternoon with kids and make a whole bunch.

2. Ribbon Wreath

ribbon wreath

This pretty wreath is perfect for winter and holiday decor. You can switch up the ribbon and flowers for a spring or summer wreath as well. We love how simple this craft is—even your kids can help you assemble for a fun crafternoon.

3. Ribbon Embroidery

Ribbon Embroidery Bouquet

If you have a knack for needlecrafts, you have to try your hand at this embroidery technique. Use ribbon instead of string to create a stunning textured flower bouquet.

4. Ribbon Heart Hair Bow

heart ribbon hairbow

Weave red and pink ribbons into a heart and wear it as a hair bow. Although this ribbon hair bow was originally made for Valentine's day, we think it would look sweet on a little girl at any time of the year.

5. Recycle an Old Lampshade Into a Chandelier

ribbon chandelier

Do you have an old lampshade that has seen better days? Recycle it into a beautiful ribbon chandelier. This repurposed shade is so pretty you will want to make more! Why not make one as a decoration for your next bridal shower or even as wedding decor?

6. Ribbon Wall Hanging

ribbon wall hanging

If you are a fan of bohemian-style home decor, then this project is for you. Knot neutral or pastel-colored ribbons in a row onto a branch. Vary the length of the ribbons so that you have a point in the middle of the wall hanging. Attach old keys, beads or jewels onto the fabric strips to add interest. What a thrifty and creative way

7. Christmas Ribbon Star Ornaments

Christmas ribbon star ornament

This beautiful ribbon Christmas star is inspired by a traditional Danish paper craft with a twist. Instead of using paper strips, swap them out with ribbon to make this delightful ornament for your tree. The Christmas star looks exceptionally pretty with red and white striped ribbon but would be lovely in another color as well.

8. Sunflower Wreath With Ribbon Rose Center

ribbon sunflower wreath

Welcome your guests with an oversized cheery sunflower wreath hanging on your front door. Paper mesh and burlap ribbon magically become a big beautiful sunflower. A lovely way to bring good cheer and sunshine to all who enter your home.

DIY Patriotic Ribbon Flag Wand - July 4th USA - FuzzyFabric.com


DIY Patriotic Ribbon Flag Wand - July 4th USA

Start by giving a few wooden dowels a coat of spray paint in red, white, or blue.  Let dry.

Create hole with nail

Before you can screw the eye screw into the end of the dowel, you will need to create a pilot hole so you don’t split the wood.  Hammer a very small nail into the end of each dowel and remove it.  Now you can screw in the eye screw, using pliers if you need to.  Add a lanyard clasp finding to the eye screw.

Ribbon Wand Ribbon Retreat

Flag Ribbons click
Chevron Ribbon click
polka Dot Ribbon click

I received these gorgeous patriotic ribbons from The Fuzzy Fabric, and they were perfect for this project. I think the American Flag ribbon might be my favorite, but the glittery ribbon is a close second.

Ribbon Wand Red White and Blue

I cut each ribbon into 4 foot lengths and threaded the ribbons onto the clasp finding.  If the ribbons aren’t secure, you can tie them off in a knot to keep them attached.

 Fourth of July Ribbon Wand

My kids love playing with the ribbon wands, dancing around, and waving the ribbons.  The wands would be great to take along to wave as you watch a summer parade or while you are waiting for the fireworks to start!

All the ribbons featured in this tutorial can be bought from Fuzzy Fabric.  I’ve gathered links to the rest of the materials I used in this tutorial.

How to Make a Pretty Wedding Wreath – Step by Step - FuzzyFabric.com


How to Make a Pretty Wedding Wreath – Step by StepA wedding wreath is an attractive and simple idea for wedding decoration, for any theme and period. Luxurious floral, fir branches, foliage, and leaves, branches and berries, ribbon and speech marks – you’ll absolutely find a wreath to fitting your decor.


Wreaths are generally dangled on entrances of the church, your home, or venue, they can be also drooped on the chairs and in the passageway for decor. You can use them as a backdrop for your ritual or reception, for taking pics in the photo booth, and for beautifying chandeliers and centerpieces. It is ideal to find one of the best wedding and craft product suppliers for buying mesh ribbons, tulle fabric, lace fabric, grosgrain ribbon, and many others.

Below, I’m going to share a step-by-step guide for making a beautiful wreath for the front door.

Materials You Will Need:

  • 12-inch Grapevine wreath
  • Silk flower bushes
  • Ribbon
  • Florist wire
  • Wire cutters
  • Hot glue gun
  • Glue sticks
  • Craft mat

Instructions:

Step 1:

Stary by including ribbon in your wreath. You can use different colors of ribbons. For adding the tails, cut the length of ribbon you will need, wrap it around the bottom of the wreath and make a knot. Repeat this process with each ribbon.

Step 2:

Use roses as your focal point. For making the roses and other flowers and greenery, you will need to trim the stems required and remove extra plastic coatings on the stems. You should open up and spread-out stems and florae, so they will look full.

Step 3:

Now, place your florae on the wreath to consider accurately where you want them before you hot glue. Place the flower stems down in the grapevine wreath to fleece them.

Step 4:

Once you have the roses place them where you like and stick them in place by adding hot glue to the stem and set the stem into the grapevine wreath.

Step 5:

Next, add extra flowers and greenery where you like and wait to hot glue while waiting for you to be sure of their placement.

Step 6:

This should be actually a full, fleecy wreath! Endure filling it in anywhere you have an unfilled space.

The above-mentioned instructions will help you to make a wedding wreath at home. You can find an online fabric supplier for buying different types of fabrics, ribbons by the yard, chair covers, tablecloths, and many others at reasonable prices.